A Guide to Installing ChromaDB on Your Local Machine and AWS Cloud
and how to take ChromaDB to run on a private network.
Hi everyone, since my last post about building a PDF chatbot with Langchain and LlamaIndex part 1. I’ve been diving deeper into various crucial aspects of creating LLM (Language Learning Models) apps. In particular, I’ve explored topics ranging from selecting the most suitable indexes for different use cases to determining the optimal embeddings to enhance model performance.
If this is the first time you visit my blog, you can read my previous blog posts in the reference links that I will put at the end of this post.
A Humble and Sincere Request
From the bottom of my heart, I truly value your interest in my previous posts and sincerely appreciate the positive impact they have had on people. Each morning, as I wake up and check the Medium notifications, seeing new individuals adding my articles to their collections fills me with joy. This motivates me to strive for continuous improvement in my writing, ensuring that I effectively convey my knowledge and experiences to those who are genuinely interested.
The outpouring of gratitude and inquiries I have received on LinkedIn has been humbling. Your messages and expressions of appreciation mean the world to me. I would be immensely grateful if you could click the “Follow” button, as it not only fuels my motivation but also allows you to stay updated with all future posts. By following, you won’t miss out on the valuable insights that will aid you in building exceptional LLM apps.
Guys, following is completely free, and it ensures that you never miss a single post. Let’s embark on this journey together, empowering one another to reach new heights.
In this blog post, we will delve into the critical aspect of LLM apps — the vector database. As you take your app development seriously, it becomes imperative to move away from local storage for your vector database. Instead, it is recommended to leverage the power of the Cloud, allowing seamless interaction between your app and the database.
This article will be divided into three informative sections. Firstly, we will explore how to install ChromaDB on your local machine, enabling you to develop and test your app locally. This initial step will lay a solid foundation for your journey.
The second section will guide you through the process of setting up ChromaDB on AWS. We will demonstrate a simplified approach, utilizing the AWS API Gateway to enhance security levels. This step will help you seamlessly transition your app to the Cloud, ensuring scalability and reliability.
Lastly, we will focus on advanced configurations by addressing the deployment of ChromaDB on a private network. This final section emphasizes the importance of heightened security measures. By implementing these practices, you can safeguard sensitive data and maintain a more secure environment for your vector database.
Let’s dive in.
ChromaDB in Local Machine
If you’ve been following my previous articles, you’re already aware of the many options available for selecting a vector database. Among the ready-to-go and native cloud platforms, there are excellent choices such as Pinecone, DeepLake, and Weaviate. However, in this article, I have chosen to focus on ChromaDB for several compelling reasons.
ChromaDB stands out as an open-source solution that offers you full control and ownership of your corporate data. By selecting ChromaDB, you can alleviate any concerns about sharing sensitive information with third-party providers. Installing and managing the vector database yourself allows you to maintain complete autonomy over your data.
By default, ChromaDB offers a convenient installation process and operates with transient memory storage. However, if you wish to preserve your data even after your app is terminated, there is a superior method available. In this section, I will guide you step-by-step on how to install ChromaDB using Docker.
Even if you’re unfamiliar with Docker, don’t worry. You can still follow this section and successfully run ChromaDB on Docker. However, if you’re new to Docker or haven’t encountered it before, I recommend starting with section 2. You can then revisit this section later, equipping yourself with essential Docker knowledge.
In the upcoming steps, I will provide clear instructions to ensure a seamless installation process. By the end of this section, you’ll have ChromaDB up and running on Docker, enabling you to store and access your data persistently, even in the event of app termination. Let’s dive in!
Step 1: Install Docker
Depending on your OS, you can find the suitable version of Docker here:
https://docs.docker.com/engine/install/
Please help yourself to verify your docker is running before proceeding to step 2.
Step 2: Clone the Chroma git repository.
git clone https://github.com/chroma-core/chromaStep 3: Build ChromaDB Container.
cd chroma
docker-compose up -d --build
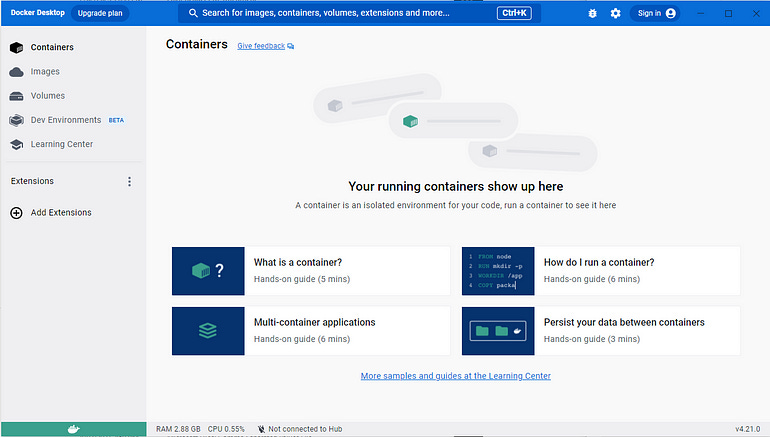
After a certain time, your ChromaDB container will be shown up in the Docker
check the server status
as you can see from the logs, the server contains is running on port 8000. You can quickly check if you can access and if there is no block to access the server API by entering the URL: http://localhost:8000/api/v1/heartbeat
Now, you just need to change your LLM app a bit to query from ChromDB which is running on your local machine
from chromadb.config import Settings

client_settings = Settings(
        chroma_api_impl="rest",
        chroma_server_host="localhost",
        chroma_server_http_port="8000"
    )

vectorstore = Chroma(collection_name="<your_db_collection>",
                     embedding_function=embed_model,
                     client_settings=client_settings)
ChromaDB in AWS Cloud with EC2 and API Gateway
Now that you’re familiar with the process of installing ChromaDB on your local machine, you have two options to consider. You can continue exploring that path for local development, or you can take a more production-oriented approach. In this section, I will provide you with step-by-step instructions on how to install ChromaDB on EC2.
By deploying ChromaDB on EC2, you can leverage the power of the cloud and ensure scalability for your application. Additionally, we will incorporate EC2 with API Gateway to enhance the security of your database.
Install ChromaDB
Requirement: Prior to proceeding, it is essential to have an active AWS Account and AWS CLI installed on your system. Given that the title mentions AWS Cloud, I assume that you are already familiar with working on the AWS Cloud. Having worked extensively as an AWS Data Architect, I have found it to be the primary platform of choice when embarking on new development projects, particularly in the realm of big data platforms.
The subsequent step is remarkably straightforward. For the purpose of simplicity, we will utilize the AWS Console UI to configure ChromaDB on EC2 through CloudFormation and AWS API Gateway. However, in practical scenarios that involve Continuous Integration/Continuous Deployment (CI/CD) and Infrastructure as Code (IaC), it is advisable to employ the AWS CLI in conjunction with Jenkins for enhanced automation and efficiency.
Here is the template URL:
https://s3.amazonaws.com/public.trychroma.com/cloudformation/latest/chroma.cf.jsonNow, search for Cloudformation from AWS Console and select “Create Stack”, paste that URL above to the Amazon S3 URL section and hit Next
In the next screen, fill the detail like this
I use t3.micro instead of t3.small because if you have a new AWS account, they will give you 12 months free of running t3.micro.
Note: ChormaDB is not suitable to run on Graviton instance.
Hit next and leave everything as it is by default then create the stack.
After a certain time, you will see the public IP of your ChromaDB in the output section. It may take some time to spin up the DB even EC2 instance is running ( check the status of EC2 to find out more)
Let’s test the public URL. Pretty cool yeah?
Now you can change the local URL to this public URL of ChromaDB and test your LLM app.
from chromadb.config import Settings

client_settings = Settings(
        chroma_api_impl="rest",
        chroma_server_host="13.211.215.161",
        chroma_server_http_port="8000"
    )

vectorstore = Chroma(collection_name="<your_db_collection>",
                     embedding_function=embed_model,
                     client_settings=client_settings)
At this step, anyone who has your public URL can access your ChromaDB. There is no authentication/authorisation or even just a simple username/password credential managed by ChromaDB itself. To make it just a little bit of security, you can add the API Gateway to proxy this public URL away with the secret token.
Note: it is still not safe to do in this way as if someone somehow knows your Public URL, they still can access it without a secret token.
API Gateway
I won’t talk much about API Gateway as it is not the purpose, I will just go straight to the step to setup API Gateway in conjunction with your public ChromaDB URL
Step 1: Go to API Gateway and create the REST API
Select New API and fill in the API name then hit Create API button.
Step 2: Under the Actions dropdown, select Create Resource.
Select Configure as Proxy Resource and hit Create Resource
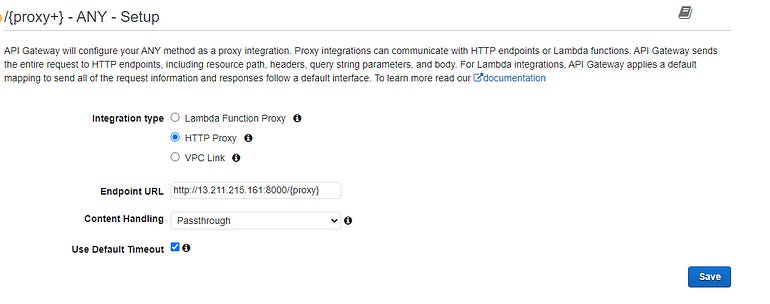
In the next screen, select the HTTP Proxy and fill in the Endpoint.
The endpoint URL: http://13.211.215.161:8000/{proxy}
Don’t forget port 8000 and anything with a proxy will just pass through
Step 3: Deploy the API
Under the Actions dropdown again, select the Deploy API
We just choose a new stage and give it a name, perhaps “Dev”
Now, we have a new API URL and nobody knows the actual server IP of the ChromaDB instance.
You are actually saved here because despite the fact that I can go through the API: https://c4ycgodxt8.execute-api.ap-southeast-2.amazonaws.com/dev/api/v1, I still can reach my public server IP.
Step 4: Add a more secure level with API Key.
Back to your API Gateway console
- select the API Keys
- Under the Actions dropdown menu, select Create API Key and give it a
You will see your key after hitting create button.
That key right there is not usable. In order to use this key, you need to add this key to a Usage Plan.
Go back to your API Gateway and select the Usage Plans menu. Give it a name and disable Throttling and disable Enable Quota as we don’t need it for the sake of demonstration.
In the next screen, select Add API Stage that you’ve created from the previous step.
Then select “Add API Key to Usage Plan” by simply typing the API Key name that you’ve created.
You may think this is done. Well no sir, I wish AWS is easy to use in that way. Now, you need to go back to API Gateway Console, select “ANY” select Method Request and change the API Key Required from false to true.
Now it is all set, all you need to do is under the Actions dropdown menu, select Deploy again to redeploy your API.
If you try to reach the /api/v1, you will get something
This means that you have successfully added the API key to protect your URL and only people who have a key can access this API.
How do you access the protected API with the API key?
For this kind of request, you will need Postman.
If you have Postman installed on your local machine, that is good, it means you are really an engineer.
Let's open Postman and try out the new API.
Fill Postman with your URL/api/v1 and use the GET method.
Select the Headers section and add “X-Api-Key” under KEY and your actual API key under the value.
If you hit Send, you will get a response, you will be able to reach the ChromaDB server
What is The Catch?
You now have an API gateway in front of our Chroma instance that is running on AWS. You also have an authentication key associated with it.
I can’t state this enough but there is a kind of glaring security hole here where people can actually go and connect directly to your server instance and bypass all of the security that we just set up through API Gateway.
However, we can take the ChromaDB to run on a Private subnet only to avoid this security hold situation.
And for me, I have to tear everything down.
Private ChromaDB in AWS Cloud
To enhance the security level of ChromaDB, one effective approach is to deploy it in a private subnet that lacks internet connectivity. This ensures that access to ChromaDB is limited to the API Gateway, which can be optionally authenticated based on your requirements.
It’s worth mentioning that this guide focuses on deploying ChromaDB on an instance rather than delving into the setup of AWS infrastructure components such as NAT Gateway, VPC, private subnet, public subnet, and Network Load Balancer, among others. Explaining all these tools and concepts comprehensively would require multiple articles, which are already abundantly available on the internet.

If you’ve reached this point in the article, I want to express my gratitude to all of you for reading and engaging with the content. I genuinely hope you have found it helpful to a certain extent, and I would greatly appreciate it if you could show your appreciation by giving it a clap. If you have any questions, please don’t hesitate to leave a comment, and be sure to follow up for future updates. Knowing that I have more followers is incredibly meaningful to me, as it signifies that the work I’ve done has been helpful to many individuals.
Enjoy your exploration, and may your journey be filled with enlightening discoveries!
As always, stay curious and keep learning. Happy coding.
Reference List
ChromaDB: https://docs.trychroma.com/api-reference
AWS Tutorials: https://aws.amazon.com/getting-started/hands-on/
LlamaIndex: https://gpt-index.readthedocs.io/en/latest/
Langchain: https://python.langchain.com
Reach out to me on my LinkedIn: https://www.linkedin.com/in/ryan-nguyen-abb844a4/


